Clean Up MacBook Air Quickly
Learn effective strategies to optimize your MacBook Air’s performance and storage space.
– Identify storage needs: Aim for 15-25% free space to enhance performance; check available storage via Apple Menu > About This Mac > Storage.
– Utilize built-in tools: Use macOS features like Optimize Storage and Manage to automatically clean files and free up space.
– Regular maintenance: Empty the Trash and clear cache periodically, and consider backup solutions like Time Machine to secure your data before major cleanups.
Wondering how to clean up your Mac Air and enhance its performance? Keeping your MacBook Air clean and optimized is vital for its longevity and efficiency. Over time, unnecessary files and applications can pile up, slowing down your device. Regular cleaning can boost your Mac’s speed and extend its lifespan.
In this guide, Ill share my personal experiences and insights on cleaning up a MacBook Air, along with clear steps and common pitfalls to avoid. Let’s explore effective strategies to reclaim valuable storage space and optimize your Mac’s performance.
Understanding Your MacBook Air’s Storage Needs
The Importance of Storage Management
Managing your MacBook Air’s storage is key for smooth operation. Storage impacts how your Mac runs. Low storage can lead to slowdowns, crashes, or even system failures. Thus, effective storage management is crucial.
Recommended Free Space Percentage
According to Apple’s guidelines, it’s recommended to keep 15-25% of your storage free for optimal performance. This buffer helps the operating system manage files and creates room for temporary files and updates. If your storage dips below this level, your Mac may struggle with performance, causing frustration during everyday tasks.
Effects of Insufficient Storage
Low storage can hurt your user experience. Applications may load slowly, the system may freeze, and you could see frequent alerts about low disk space. Regularly checking and managing your storage helps prevent these issues and ensures a smooth experience.
Checking Available Storage on Your MacBook Air
Step-by-Step Guide
To kick off your cleanup, check how much storage you have. Follow these steps:
- Click the Apple Menu in the top left corner.
- Select About This Mac.
- Go to the Storage tab.
This breakdown shows how much space is used and how much is free, categorized by files, apps, and system data.
Interpreting the Storage Breakdown
Knowing what occupies space on your Mac is important. Categories like Apps, Documents, System, and Other help you spot areas to free up space. If apps take up a lot of space, consider uninstalling those you no longer use.
Using Built-in Tools to Clean Up Your MacBook Air
Personal Experience: A MacBook Air Transformation
When I first bought my MacBook Air, I was thrilled by its sleek design and promised speed. However, after a year of use, I noticed it was becoming sluggish. Apps took longer to open, and I often received notifications about low storage. This was disheartening, especially since I depended on my laptop for both work and leisure.
The Revelation
One day, I decided it was time to tackle the issue head-on. I followed the steps outlined in a similar guide I found online. I started by checking my storage through the Apple Menu and was shocked to discover that I was using almost 80% of my available space! The breakdown showed that a large portion was taken up by applications and cached files.
The Cleanup Process
I proceeded to uninstall unused applications. I realized I had several games and programs from college that I hadn’t touched in months. Using Finder and the AppCleaner tool made it easy to remove them completely. Next, I ventured into my cache folders and manually cleared out gigabytes of temporary files. This step felt particularly rewarding as I saw immediate improvements in my laptops responsiveness.
The Results
With a little effort, I freed up over 30 GB of space! My MacBook Air now runs like new, and Ive set a monthly reminder to repeat this process. Its not just about storage; the difference in performance was palpable. I could finally enjoy my favorite apps without frustration, and I learned the importance of regular maintenance to keep my device in top shape.
This experience taught me that a little housekeeping can go a long way in optimizing performance and extending the life of my MacBook Air. I encourage anyone facing similar issues to take the plunge and clean up their device; the results are well worth the effort!
Overview of Built-in Storage Management Features
macOS offers built-in tools for effective storage management. Using these features simplifies the cleaning process, ensuring your Mac runs smoothly.
Optimize Storage Feature
One helpful tool is the Optimize Storage option. This feature automatically manages space by removing watched iTunes movies and TV shows and can store files in iCloud when you’re low on space. To access this feature:
- Return to the Storage tab under About This Mac.
- Click the Manage button.
The Manage Button Options
After clicking the Manage button, several options to clean up files appear:
- Documents: Review large files and delete those you no longer need.
- Mail: Remove attachments from old emails.
- Empty Trash Automatically: Ensure deleted files do not linger in the Trash.
These tools simplify cleanup, helping users maintain their Macs performance.
Uninstalling Unused Applications on Your MacBook Air
How to Properly Uninstall Applications
Unused applications can take up a lot of space. Uninstalling them is easy:
- Open Finder and go to the Applications folder.
- Find the app you wish to uninstall.
- Drag the app to the Trash or right-click and select Move to Trash.
Using Launchpad for Uninstallation
You can also use Launchpad to remove applications:
- Open Launchpad.
- Locate the application you want to delete.
- Click and hold the app icon until it jiggles, then click the X that appears.
Complete Removal with Tools
For thorough removal, consider using tools like AppCleaner. This app helps find and delete associated files (like settings and preferences) that might remain after you uninstall an app, ensuring no unnecessary files are left behind.
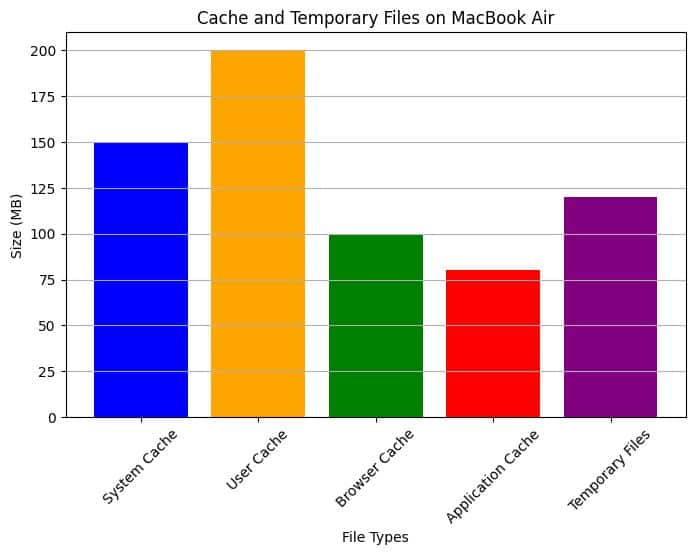
Clearing Cache and Temporary Files on Your MacBook Air
Understanding Cache and Temporary Files
Cache and temporary files are created by applications to speed up processes. While they enhance performance, they can accumulate and consume valuable disk space over time. Regularly clearing these files keeps your Mac efficient.
Methods to Clear Cache
You can clear cache files using these methods:
- Manually via Finder:
1. Open Finder.
2. Press Command + Shift + G and type~/Library/Caches.
3. Select the files you want to delete and move them to the Trash. - Using Disk Utility:
1. Open Disk Utility from the Utilities folder.
2. Select your startup disk and click First Aid to clean up system files.
Importance of Periodic Cache Clearing
Clearing cache files regularly can free up space and improve system performance. Make this part of your routine maintenance.
Managing and Deleting Large Files on Your MacBook Air
Identifying Large Files
Finding large files on your Mac is essential for effective storage management. Use Finders Sort by Size feature:
- Open Finder and navigate to your home folder.
- Click the View menu and select Show View Options.
- Choose to sort by Size.
Storage Management Tools
macOS provides Storage Management tools to help identify large files quickly. Access this from the Manage section in the Storage tab. This highlights files that occupy significant space, helping you decide what to delete or move.
Handling Large Files
Once you find large files, consider these options:
- Moving to External Drives: For files you rarely use, move them to an external hard drive to free up space on your Mac while keeping your files accessible.
- Offloading to Cloud Storage: Services like iCloud or Google Drive are excellent for storing media files and documents. This saves local storage and allows easy access from any device.
Emptying the Trash on Your MacBook Air
Importance of Emptying the Trash
Files in the Trash still use storage until you empty it. Regularly emptying your Trash is a simple yet effective way to reclaim space on your Mac.
Setting Up Reminders
To avoid clutter, set a reminder to empty your Trash regularly. This can be a weekly or monthly task, depending on your usage. Keeping your Trash empty helps maintain optimal storage levels.
Utilizing iCloud for Storage Optimization on Your MacBook Air
How iCloud Assists with Storage Management
iCloud can help manage your MacBook Air’s storage. By using iCloud, you can offload files and photos, creating more space on your device without losing access to them.
Step-by-Step Guide to Setting Up iCloud
- Open System Preferences and select Apple ID.
- Click iCloud and enable iCloud Drive.
- You can store your Desktop and Documents in iCloud, automatically uploading files to your iCloud storage.
Configuring Settings for Automatic Offloading
Set up your settings to automatically offload files. This helps manage storage seamlessly, keeping your important files accessible while less critical data is stored in the cloud.
Physical Cleaning of Your MacBook Air
Importance of Physical Maintenance
Digital cleaning is important, but keeping your MacBook Air physically clean is equally crucial. Dust and debris can cause overheating and hardware issues.
Tips for Safe Cleaning
Use these tips to clean your MacBook Air safely:
- Use a Soft Microfiber Cloth: Gently wipe the screen with a microfiber cloth to avoid scratches.
- Canned Air for the Keyboard and Vents: Use canned air to blow dust from the keyboard and vents, ensuring proper airflow.
- Recommended Cleaning Products: Avoid harsh chemicals. Use gentle cleaning solutions made for electronics.
Regular physical cleaning enhances your Mac’s longevity and performance, making it a key part of your maintenance routine.
Regular Maintenance Tips for Your MacBook Air
Importance of Routine Maintenance
Establishing a regular maintenance schedule is crucial for your MacBook Air’s performance. Routine checks can prevent small issues from turning into major problems.
Suggested Maintenance Schedule
Create a maintenance schedule that includes monthly or quarterly tasks. This could involve:
- Checking available storage.
- Clearing cache and temporary files.
- Reviewing installed applications.
Maintenance Checklist
Heres a quick checklist to keep you organized:
- Check storage status.
- Clear cache and temporary files.
- Uninstall unused applications.
- Empty the Trash.
- Physically clean your MacBook Air.
Third-Party Apps for Cleaning Up Your MacBook Air: Pros and Cons
Evaluating Third-Party Cleaning Applications
While macOS provides built-in tools, many users explore third-party applications like CleanMyMac or CCleaner for cleaning. These apps can automate the cleanup process but come with pros and cons.
Benefits of Third-Party Tools
Third-party tools often offer features like:
- Automation: Schedule regular cleanups to save time.
- Thoroughness: These apps can find and remove files that built-in tools might miss.
Drawbacks and Caution
However, consider these drawbacks:
- Potential System Harm: Some apps might accidentally delete important system files, causing issues.
- Cost: Many reputable cleaning apps require purchase, which may not suit all users.
Research trusted applications to ensure your Mac’s safety.
| Maintenance Task | Frequency | Tools/Method | Notes |
|---|---|---|---|
| Check available storage | Monthly | About This Mac > Storage | Ensure at least 15-25% free space |
| Clear cache and temporary files | Monthly | Finder or Disk Utility | Regular clearing can enhance performance |
| Uninstall unused applications | Quarterly | Finder or Launchpad | Identify apps that are no longer needed |
| Empty the Trash | Weekly | Trash icon | Keeps storage optimized |
| Physically clean the MacBook Air | Monthly | Microfiber cloth, canned air | Prevents overheating and hardware issues |
| Backup important data | Before major cleanup | Time Machine or cloud solutions | Protects against data loss during cleanup process |
Data Backup Considerations Before Cleaning Up Your MacBook Air
Importance of Data Backup
Before starting any major cleanup, back up your data. This protects your important files during the cleaning process.
Backup Options
Consider these backup options:
- Time Machine: This built-in macOS feature makes automated backups easy. Connect an external drive and enable Time Machine to back up your files.
- Cloud-Based Backups: Services like iCloud and Dropbox offer extra security for your data, allowing access from anywhere.
Setting Up Backups
To set up Time Machine:
- Connect an external drive to your Mac.
- Open System Preferences and select Time Machine.
- Click Select Backup Disk, choose your external drive, and turn on Time Machine.
Conclusion
Cleaning your MacBook Air is vital for maintaining performance and ensuring a smooth user experience. By understanding your storage needs, utilizing built-in tools, and learning from my personal challenges during the process, you can optimize your device effectively.
Take action now by implementing these steps to keep your MacBook Air in top shape. Regular maintenance enhances performance and extends your device’s lifespan. Share your tips and experiences in the comments below as we build a community of tech enthusiasts dedicated to maintaining their devices.