Clean Up Disk Space MacBook Pro
Learn effective strategies to reclaim disk space on your MacBook Pro for better performance and user experience.
– Discover how to identify and manage different storage types, ensuring you maintain at least 50-100 GB of free space for optimal system performance.
– Utilize built-in macOS tools like “Optimize Storage” and learn the importance of regularly emptying the Trash and organizing your Downloads folder.
– Explore safe methods to delete unused apps and clear cache files, as well as options for external storage and recommended disk cleanup tools to maximize your available disk space.
Are you looking to clean up disk space on your MacBook Pro? Maintaining disk space is crucial for optimal performance and user experience. A cluttered disk can lead to slow system speeds, frequent application crashes, and difficulties in installing updates. Moreover, insufficient storage can hinder your ability to save new files and access essential applications. This article will explore seven smart ways to clean up disk space on your MacBook Pro, ensuring that your device runs smoothly and efficiently.
Understanding Storage Management on MacBook Pro
I.1 Definition of Storage Types
To effectively manage your storage, it’s essential to understand the different types of files occupying your disk space. Here are the main categories:
- System Files: These are necessary for macOS to function correctly, including the operating system itself and essential applications. While you can’t delete these files, they can grow in size over time, especially if you have multiple macOS updates.
- User Files: This category includes documents, photos, videos, and other personal files. Regularly reviewing and cleaning these files can significantly free up space.
- Cache Files: Cache files are temporary files created by applications to speed up processes. While they can enhance performance, excessive cache accumulation can consume valuable disk space.
- Temporary Files: These files are generated during tasks, such as downloads or installations, and are often left behind. They can be safely deleted once their purpose has been fulfilled.
Understanding these types of storage can help you make informed decisions about what to keep and what to delete to maintain optimal performance.
I.2 Identifying Storage Utilization
Knowing how to check your available storage is the first step to cleaning up disk space. Follow these steps to identify your storage utilization:
- Click on the Apple menu in the top-left corner of your screen.
- Select About This Mac.
- Click on the Storage tab.
Here, you will see a visual breakdown of how your storage is being used, including categories like Applications, Documents, and System. This insight is crucial to determine which areas require cleaning. For further details, refer to the official Apple support page.
I.3 Recommended Free Space
To ensure optimal performance, it’s generally recommended to keep at least 50-100 GB of free space on your MacBook Pro. When your disk space dips below this threshold, you may experience slowdowns and issues with system updates. Having sufficient free space allows your Mac to operate effectively, ensuring that applications run smoothly, and the system can manage temporary files and caches efficiently.
Utilizing Built-in Tools to Clean Up Disk Space
II.1 Optimize Storage Feature
macOS includes a powerful built-in tool called Optimize Storage that helps manage files more effectively. To access this feature:
- Go to the Apple menu.
- Select About This Mac.
- Click on the Storage tab, then select Manage.
Here, you’ll find several options, including recommendations for storing files in iCloud, emptying the Trash automatically, and reviewing large files. This tool can help streamline your storage management by automatically suggesting files to delete or relocate, making your cleanup process effortless. For more details, check out the Optimize Storage support page.
II.2 Emptying Trash
Emptying the Trash is a simple yet often overlooked step in maintaining disk space. To empty your Trash:
- Right-click on the Trash icon in your dock.
- Select Empty Trash.
You can also use the keyboard shortcut Command + Shift + Delete to empty the Trash quickly. Regularly emptying the Trash is essential because deleted files still occupy space until the Trash is cleared. I’ve found that making it a habit to empty the Trash weekly has kept my disk space in check.
II.3 Managing Downloads
The Downloads folder can quickly accumulate files, leading to unnecessary disk usage. To manage your Downloads effectively:
- Regularly review the contents of your Downloads folder.
- Delete files you no longer need.
- Organize important downloads into designated folders for easy access.
Creating a routine for reviewing your Downloads folder will help maintain your disk space and keep your files organized. I often designate a specific day each month to clean out my Downloads folder, which has made a noticeable difference in my available disk space.
Deleting Unused Applications
III.1 Identifying Unused Apps
Identifying applications that you rarely use is a vital step in freeing up disk space. You can do this by:
- Opening your Applications folder in Finder.
- Sorting the applications by the Last Opened date.
This sorting method will help you find apps that you haven’t used in a while, making it easier to decide what to delete. I often find that apps I intended to use just clutter up my space without being utilized.
III.2 Uninstalling Applications
Once you’ve identified unused applications, you can safely uninstall them by following these steps:
- Open the Applications folder.
- Drag the unused app to the Trash.
- Empty the Trash to permanently remove the app.
Alternatively, you can use Launchpad to uninstall apps by clicking and holding an app until it wiggles, then clicking the X icon. Uninstalling applications you no longer need will free up significant disk space. I once cleared about 10 GB by removing old games and apps that I hadn’t used in years.
Clearing Cache and Temporary Files
IV.1 What Are Cache Files?
Cache files are temporary files created by applications to speed up processes. While they are beneficial in enhancing performance, they can take up a significant amount of disk space if not managed properly. Over time, cache files can accumulate, especially from web browsers and applications that frequently update.
IV.2 How to Clear Cache
To clear cache files safely, you can either delete them manually or use built-in utilities. Heres how to do it manually:
- Open Finder.
- Press Command + Shift + G to open the Go to Folder dialog.
- Type
~/Library/Cachesand press Enter. - Review the folders for applications you use and delete cache files that are taking up unnecessary space.
Be cautious when deleting cache files, as some applications may require certain files to function correctly. If you’re unsure, its best to use built-in utilities or trusted third-party tools. In my experience, using a tool like CleanMyMac has helped prevent accidental deletions while clearing cache.
Moving Files to External Storage
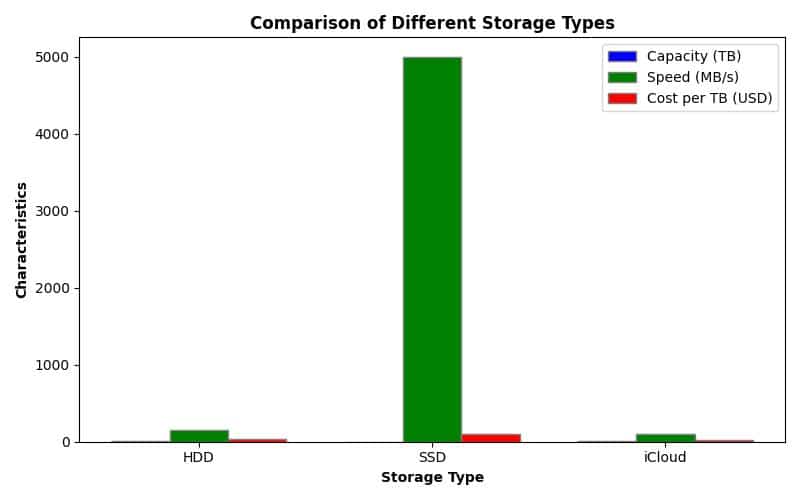
V.1 Benefits of External Storage
Using external storage solutions, such as external hard drives or cloud services (like iCloud, Google Drive, or Dropbox), can significantly help in cleaning up disk space. External storage allows you to keep important files without cluttering your internal disk. It also provides extra security for your data, as files stored externally are less susceptible to hardware failures.
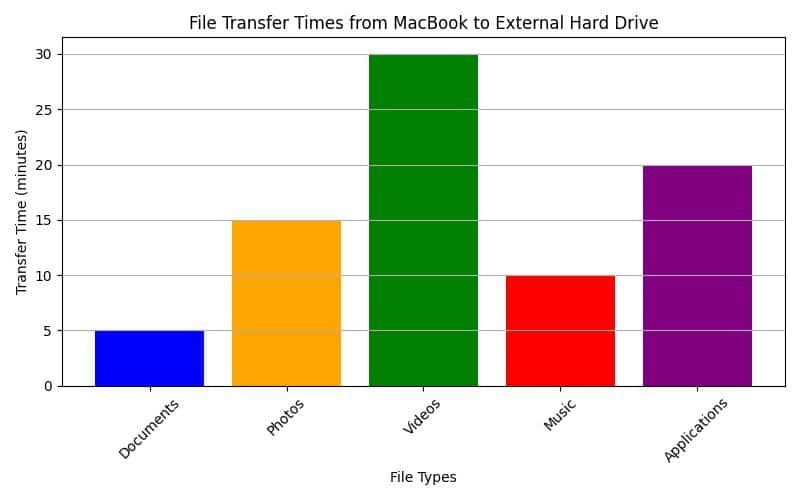
V.2 How to Move Files
To move files to external storage, follow these steps:
- Connect your external drive to your MacBook Pro.
- Open Finder and locate the files you want to move.
- Drag and drop the selected files to your external drive in the Finder sidebar.
Organize your files on the external drive into folders for easy access. This practice not only frees up space on your Mac but also keeps your data organized and accessible when needed. I’ve set up my external drive with categorized folders, making it easy to find files when I need them.
Using Disk Cleanup Tools
VI.1 Recommendations for Safe Tools
There are several trusted applications available that can help manage disk space effectively, such as OmniDiskSweeper and GrandPerspective. These tools analyze your disk usage and help identify large files and duplicates that may be taking up unnecessary space. Always choose reputable software to avoid potential scams or malware. I personally recommend checking user reviews and ensuring the app is from a reputable source before downloading.
VI.2 How to Use These Tools
To use these disk cleanup tools:
- Download and install the application from their official website.
- Launch the tool and allow it to scan your disk.
- Review the results and identify files you can safely delete.
These tools often provide visual representations of file usage, making it easier to understand which files consume the most space. I once identified a hidden folder that was taking up over 15 GB of space thanks to GrandPerspective.
Keeping System Data in Check
VII.1 Understanding System Data
The Other/System Data category in your storage overview can be confusing. It includes system files, caches, and other files that macOS needs to function but cannot be easily cleared. Understanding this category is essential, as it can significantly impact your available disk space.
VII.2 Managing System Data
While you cant directly delete most files in the System Data category, you can manage it by regularly updating macOS, uninstalling unnecessary applications, and clearing caches as previously discussed. If you notice excessive System Data usage, consider looking into whether certain applications or system updates might be bloating your storage.
Regular Maintenance Tips
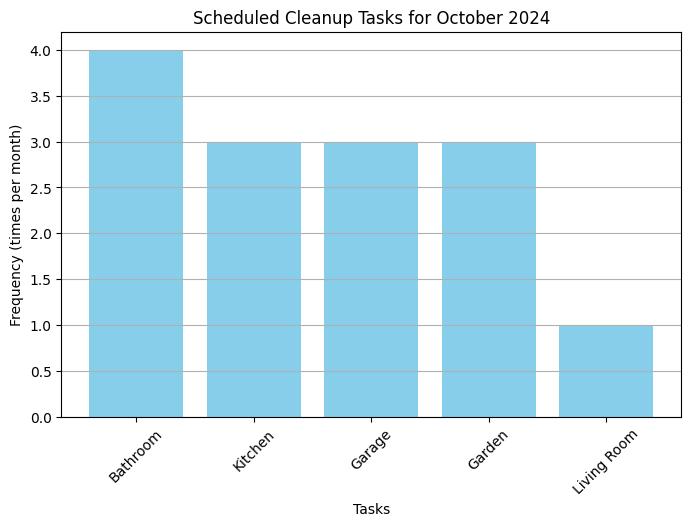
VIII.1 Scheduled Cleanup
Establishing a regular cleanup schedule is vital for maintaining disk space on your MacBook Pro. Consider setting aside time monthly or bi-monthly to review your storage. During each session, perform the following tasks:
- Empty the Trash.
- Review Downloads and delete unnecessary files.
- Check for unused applications and uninstall them.
- Clear cache and temporary files.
Having a checklist can streamline your cleaning process and ensure nothing is overlooked. I use a digital reminder on my calendar to prompt me for these maintenance tasks, which has helped me stay consistent.
VIII.2 Monitoring Storage Usage
Encourage users to monitor their storage usage over time using built-in tools. Regular checks can help avoid future disk space issues and maintain optimal performance. By staying proactive, you can prevent slowdowns and ensure that your Mac operates smoothly.
Personal Experience: The Day My MacBook Pro Couldn’t Keep Up
The Warning Signs
A few months ago, I noticed my MacBook Pro was running slower than usual. Every time I opened an application, I would see the dreaded spinning beach ball, and it would take forever to load my documents. I thought it was just a phase until I received an alarming notification that my disk space was almost full.
Taking Action
Determined to reclaim my MacBook’s performance, I decided to dive into the storage management features. I started by checking “About This Mac” to get a clearer picture of what was taking up space. To my surprise, the Downloads folder was overflowing with files I had long forgotten about. I took an afternoon to sift through it and deleted over 10 GB of old files.
The Power of Optimization
Next, I explored the “Optimize Storage” feature. I was amazed at how easy it was to automatically manage files. It prompted me to delete movies and TV shows I had already watched, freeing up another 15 GB. It felt liberating to see my available storage go from a mere 5 GB to nearly 30 GB in just a couple of hours.
The Lesson Learned
This experience taught me the importance of regular maintenance. I now set a reminder every month to review my storage and clean up unnecessary files. Not only has my MacBook Pro regained its speed, but I also feel more organized and in control of my digital space. I encourage anyone facing similar issues to take action before those warnings become critical. Regular upkeep can prevent a lot of headaches down the line!
Upgrading Storage
IX.1 When to Consider Upgrading
If you’re frequently encountering alerts about low disk space or experiencing noticeable slowdowns, it may be time to consider upgrading your storage. Signs that indicate the need for more storage include:
- Frequent system notifications about low disk space.
- Slow application launch times.
- Difficulty installing updates or new software.
Upgrading your storage can significantly improve your MacBook’s performance and provide more room for your files.
IX.2 Options for Upgrading
There are several options available for upgrading your storage:
- Cloud Storage: Services like iCloud, Google Drive, and Dropbox offer flexible storage options that can grow with your needs. Compare their features, pricing, and usability to find the best fit for you.
- External Hard Drives: Investing in an external hard drive provides a physical solution for additional storage. Look for drives with ample space and fast transfer rates to optimize your experience.
- Internal Upgrades: If youre comfortable with hardware, consider upgrading your internal SSD (if possible) for added storage. Check your MacBook Pro model to see if this is a viable option.
Conclusion and Best Practices
X.1 Recap of Key Steps
| Technique | Description | Frequency | Tools/Resources |
|---|---|---|---|
| Optimize Storage | Use macOS built-in feature to manage files and recommendations. | As needed | Apple Support: Optimize Storage |
| Empty Trash | Regularly clear the Trash to free up space occupied by deleted files. | Weekly | N/A |
| Manage Downloads | Review and organize the Downloads folder to remove unnecessary files. | Monthly | Finder |
| Uninstall Unused Applications | Identify and remove applications that are seldom used. | Monthly | Finder, Launchpad |
| Clear Cache and Temporary Files | Delete cache files manually or use utilities to clear space. | Monthly | CleanMyMac, Finder |
| Move Files to External Storage | Store files on external drives or cloud services for better organization. | As needed | iCloud, Google Drive, Dropbox |
| Use Disk Cleanup Tools | Utilize third-party applications to analyze disk usage. | Quarterly | OmniDiskSweeper, GrandPerspective |
| Monitor Storage Usage | Regularly check storage utilization to prevent low space issues. | Bi-weekly | macOS Disk Utility |
| Upgrade Storage | Consider upgrading options when consistently low on space. | As needed | External hard drives, cloud storage options |
In summary, cleaning up disk space on your MacBook Pro involves understanding storage management, utilizing built-in tools, deleting unused applications, clearing cache files, and moving files to external storage. Regular maintenance and monitoring can ensure your device operates efficiently.
X.2 Encouragement for Regular Maintenance
Regular maintenance is essential for performance and longevity. By adopting the practices outlined in this article, you can keep your MacBook Pro running smoothly. Share your own tips and experiences in the comments below, and lets foster a community of tech enthusiasts dedicated to maximizing their devices’ performance.