|——————————–|————-|——————–|———-|
| Built-in Storage Management | Use macOS built-in tools to manage disk space. | Access via Apple menu > About This Mac > Storage > Manage. | Personalized recommendations, easy identification of large files. |
| Identifying Large Files | Locate large files using Finder. | Open Finder, use Command + F, set criteria for file size. | Quickly find and delete unnecessary large files. |
| Clearing Cache and Log Files | Remove temporary files that accumulate over time. | Go to Finder > Go > Go to Folder > ~/Library/Caches. | Frees up storage taken by system files. |
| Application Management | Uninstall unused applications. | Use Launchpad or Finder to delete apps. | Frees up significant space by removing unneeded apps. |
| Regularly Emptying the Trash | Permanently delete files in Trash. | Right-click on Trash > Empty Trash. | Recovers disk space that files in Trash occupy. |
| Leveraging Cloud Storage | Store files in the cloud to free local space. | Set up iCloud Drive via System Preferences > Apple ID > iCloud. | Access files remotely, reduces local storage usage. |
| Utilizing External Drives | Expand storage with external devices. | Connect drive, drag files to it in Finder. | Offloads large media files to free internal storage.|
Top 7 Ways to Clean Up Mac OS Disk Space Easily
Clean Up macOS Disk Space
Learn effective strategies to free up disk space on your Mac for improved performance and efficiency.
– Discover built-in macOS tools like the Storage Management Tool to identify and remove large files and unnecessary applications easily.
– Understand how to check your available disk space and maintain optimal health by keeping at least 15-20% free space.
– Explore options for leveraging cloud storage and external drives, enhancing your storage management while keeping your local disk uncluttered.
Are you looking for ways to clean up Mac OS disk space? Cleaning up disk space on macOS is crucial for maintaining optimal system performance. With every application you install, file you download, and media you save, your Mac’s storage can quickly fill up. Insufficient disk space can lead to slowdowns, crashes, and application malfunctions, which can be frustrating for users who rely on their devices for productivity and leisure.
In this article, we will explore effective strategies to clean up macOS disk space, ensuring your Mac runs smoothly and efficiently. We will cover everything from built-in tools to proactive maintenance practices, providing you with the knowledge you need to manage your Mac’s storage like a pro.
Understanding Disk Space on macOS
Overview of macOS Storage Structure
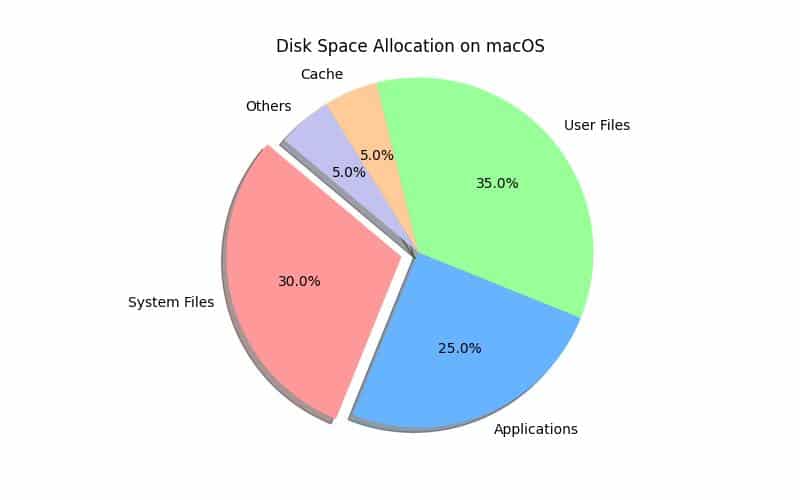
Understanding how disk space is allocated on your Mac is essential for effective management. macOS organizes storage into three primary categories:
- System Files: These crucial files form the backbone of your operating system. They include essential components that allow macOS to function properly. It’s vital to avoid tampering with or deleting these files unless you are certain of their purpose.
- Applications: The software you install on your Mac takes up a significant portion of your disk space. Regularly reviewing and managing your applications ensures you’re not holding onto unused programs that could be taking up valuable storage.
- User Data: This category encompasses all your personal files, such as documents, photos, videos, and downloads. User data can quickly accumulate, especially if you frequently download new files or save media.
Recommended Practice: Maintaining 15-20% Free Space
For optimal performance, its generally recommended to keep at least 15-20% of your total drive capacity as free space. This buffer allows macOS to perform essential tasks, such as caching and temporary file storage, without slowing down your system. If your Mac’s storage is constantly full, you may experience performance issues, including extended loading times and application crashes.
SSD vs. HDD: How Each Type Impacts Performance and Storage Management
The type of storage drive you have can also influence how you manage your disk space. Solid State Drives (SSDs) are faster and more efficient than traditional Hard Disk Drives (HDDs). SSDs provide quicker access to files and programs, which can enhance overall system performance. However, they typically have less storage capacity compared to HDDs, making it even more crucial to manage your disk space effectively.
Checking Available Disk Space
Step-by-Step Guide on Checking Available Storage
Before you can clean up your disk space, its essential to know how much space you have available. Heres how to check it:
Using “About This Mac”
- Click the Apple logo in the top-left corner of your screen.
- Select About This Mac from the dropdown menu.
- Navigate to the Storage tab. Here, you will see a visual representation of your storage usage, including how much space is used and how much is available.
Using System Preferences
- Open System Preferences by clicking the Apple logo and selecting it from the dropdown.
- Click on Apple ID (if you’re running macOS Catalina or later).
- Select iCloud from the sidebar, and then click on the Manage button. This will give you an overview of how much local storage is being used by iCloud and other applications.
Visual Aids or Screenshots to Facilitate Understanding
Using visual aids can help users navigate these settings more easily. If you have the ability to create or provide screenshots, including them in this section can enhance understanding and assist users in following the steps without confusion. For official visual references, consider visiting Apple’s support page.
Built-in macOS Tools for Disk Cleanup
Overview of Built-in Tools for Optimizing Storage
macOS comes equipped with several built-in tools to help you manage and optimize your storage effectively.
Storage Management Tool
To access the Storage Management tool:
- Click the Apple logo.
- Select About This Mac and navigate to the Storage tab.
- Click the Manage button.
This tool provides several features designed to help you reclaim space:
- Recommendations: macOS offers personalized recommendations for freeing up space based on your usage patterns. This may include options like emptying the Trash or optimizing storage for photos.
- Large Files and Unused Applications: The tool allows you to easily identify and manage large files and applications that you seldom use, making it simpler to decide what to delete or archive.
Utilizing the Optimize Storage Option
The Optimize Storage feature can automatically manage files, such as removing movies and TV shows you’ve already watched from your Mac if you stream them through iTunes or Apple TV. This option can significantly reduce the amount of space used by media files.
Identifying and Deleting Large Files
Using Finder to Locate Large Files
One of the most effective ways to free up disk space is by identifying and deleting large files. Heres how to do that using Finder:
- Open Finder.
- Click on File in the menu bar and select Find (or press Command + F).
- In the search bar, click on the + button to add search criteria.
- Choose File Size from the dropdown menu and set it to is greater than 100 MB (or whatever size you consider significant).
This process will display all files that exceed your specified size, allowing you to review and decide which ones to delete or move.
Creating Smart Folders for Efficient File Management
Creating Smart Folders in Finder can help you automatically organize files based on specific criteria, such as size or file type. This can be an effective method for keeping track of large files that may need to be reviewed and deleted regularly.
Guidelines for Identifying Files to Delete or Move
Focus on specific types of files that often take up significant space:
- Media Files: Videos and high-resolution images can quickly consume storage. Consider moving these to an external drive or cloud storage if they are not needed immediately on your device.
- Downloads: The Downloads folder tends to accumulate files that are rarely accessed after being downloaded. Regularly clean out this folder to recover space.
- Old Backups: If you use Time Machine or other backup solutions, check for old backups that can be deleted to free up space.
Strategies for Managing Applications
Reviewing installed applications is also crucial. Identify rarely used applications and consider uninstalling them to reclaim space. You can do this by:
- Using the Launchpad: Open Launchpad, find the application you want to delete, and click and hold its icon until it jiggles. Then click the X to uninstall it.
- Using Finder: Navigate to the Applications folder, drag the app you wish to delete to the Trash, and then empty the Trash.
Cleaning Up System Files
Step-by-Step Instructions for Clearing Cache Files, Log Files, and Temporary Files
Over time, your Mac accumulates various system files, including cache and log files, which can take up a significant amount of space. Here’s how to clear them:
- Open Finder and click on Go in the menu bar.
- Select Go to Folder and type in
~/Library/Caches. This will take you to the Caches folder. - You can manually delete files within this folder; however, be cautious not to delete the entire folder.
Accessing Library Folders Safely
The Library folders contain important files. To access them safely, use the Go to Folder option in Finder. This method prevents accidental deletions.
Best Practices for File Deletion
When deleting files, always ensure you know what you are removing. If you’re unsure, consider moving files to an external drive or cloud storage temporarily before permanently deleting them.
Importance of Regularly Clearing Out the Downloads Folder
As previously mentioned, the Downloads folder can become a storage trap. Regular maintenance of this folder is essential for freeing up space. Set a reminder to check this folder weekly or monthly.
Application Management
Comprehensive Guide to Uninstalling Unneeded Applications
Uninstalling applications you no longer use can free up a considerable amount of space. Use the following methods to uninstall applications effectively:
Using Launchpad and Finder for Effective Uninstallation
- Using Launchpad: Open Launchpad, find the application, click and hold until it jiggles, and click the X.
- Using Finder: Go to the Applications folder, find the app, drag it to the Trash, and then empty the Trash.
Ensuring All Associated Files Are Removed to Maximize Space
Some applications leave behind associated files even after uninstallation. To ensure complete removal:
- Search for folders in
~/Library/Application Support/and~/Library/Preferences/that correspond to the application you uninstalled. - Delete any leftover files carefully.
Discussion of Application Bundles and Proper Management Methods
Understanding application bundles can also help you manage disk space. Some applications are packaged with additional files that may not be necessary. Be selective about what you keep and regularly review your installed applications.
Regularly Emptying the Trash
Simple Guide to Emptying the Trash Effectively
Emptying the Trash is often overlooked but is a straightforward way to reclaim space. Follow these steps:
- Right-click on the Trash icon in the dock.
- Select Empty Trash from the context menu.
- Confirm the action to permanently delete the files.
Importance of Regularly Emptying the Trash to Recover Disk Space
Files in the Trash still occupy disk space. Make it a habit to empty the Trash regularly to maintain optimal storage levels. Consider setting a reminder to do this weekly.
Risks of Leaving Files in the Trash and Potential Impacts
Leaving files in the Trash can lead to unnecessary storage issues, especially if youre nearing capacity. Its vital to cultivate the habit of regularly clearing out the Trash to keep your Mac running smoothly.
Leveraging Cloud Storage Solutions
Overview of iCloud and Alternative Cloud Services for File Storage
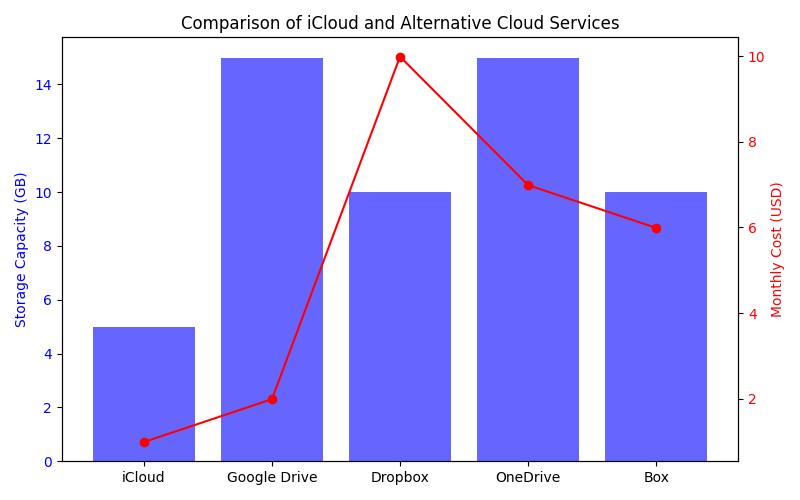
Cloud storage solutions are a great way to free up local disk space. iCloud is integrated into macOS and allows for seamless storage of documents, photos, and backups. Other popular options include Google Drive, Dropbox, and OneDrive.
Setting Up iCloud Drive and Its Integration with macOS
To set up iCloud Drive:
- Go to System Preferences and select Apple ID.
- Click on iCloud and enable iCloud Drive.
- Choose the folders you want to store in the cloud to help manage local storage.
Benefits of Cloud Storage for Freeing Up Local Disk Space
Using cloud storage has various benefits, such as:
- Accessibility: Access your files from any device with internet connectivity.
- Backup: Cloud storage provides an additional layer of security against data loss.
- Space Management: Storing large files in the cloud means less clutter on your local storage.
Pros and Cons of Different Cloud Services
While iCloud integrates seamlessly with macOS, other services may offer different features, such as collaboration tools or more storage space. Consider your needs when choosing a cloud storage provider.
Utilizing External Drives for Storage
Recommendations for External Hard Drives and SSDs
External storage solutions such as hard drives and SSDs can be excellent for expanding your Mac’s storage capacity. When choosing an external drive, consider:
- HDDs: Generally offer more storage for less cost but are slower.
- SSDs: Faster and more reliable but typically more expensive for the same amount of storage.
Detailed Instructions for Transferring Files to External Drives
To transfer files to an external drive:
- Connect the external drive to your Mac.
- Open Finder and locate the files you want to move.
- Drag and drop the files to the external drive icon in Finder.
Step-by-Step Transfer Process and Organization Tips
Organize files on your external drive into folders based on categories such as photos, documents, and media. This will make it easier to find what you need in the future.
Regular Maintenance Practices for Disk Cleanup
Suggested Frequency for Performing Disk Clean-Ups
To keep your Mac running efficiently, establish a routine for disk clean-ups. Aim to perform maintenance tasks monthly, including checking for large files, emptying the Trash, and reviewing installed applications.
Setting Up Reminders for Regular Maintenance
Using a calendar app or task management tool can help you set reminders for regular maintenance tasks. This will ensure you stay on top of your disk space management.
Importance of Keeping the System Updated and Running Periodic Checks
Keeping your macOS updated is equally important for performance and security. Regularly check for updates and make it a habit to run disk checks using Disk Utility, which can help identify and fix disk errors.
Caution with Third-party Cleanup Applications
Risks Associated with Third-party Cleaning Tools
While third-party cleanup applications may promise quick fixes for disk space issues, they can pose several risks, including:
- Data Loss: Some tools may mistakenly delete important files.
- System Instability: Incompatible software can lead to system crashes or malfunctions.
- Privacy Issues: Some applications may access personal data without your consent.
Recommendations for Manual Cleaning Processes
Instead of relying on third-party apps, its better to manually manage your disk space. This gives you greater control over what is deleted and minimizes the risk of losing important files.
Personal Experience: A Lesson in Disk Management
The Day My Mac Almost Gave Up
I still remember the day my MacBook Pro, which I had owned for nearly five years, started behaving oddly. It was mid-March 2023, and I was in the middle of a crucial project for my job as a graphic designer. I had been putting off cleaning up my disk space, thinking that the occasional cleanup of my Downloads folder would suffice. Little did I know, my neglect would soon come back to haunt me.
As I attempted to save my latest design, a dreaded notification popped up: Your disk is almost full. Panic set in as I watched my Mac freeze, unable to save my work. After a few moments of frustration, I decided to take action. I navigated to “About This Mac” and discovered that over 80% of my storage was consumed by large media files and applications I hadnt used in months.
In a race against time, I utilized the built-in Storage Management Tool. I identified old video projects, unused applications, and a mountain of photos that I could easily transfer to an external hard drive. Within an hour, I freed up almost 30 gigabytes of space.
This experience taught me the importance of regular maintenance. Now, I set a monthly reminder to check my storage and clean it up. Ive also integrated cloud storage for my ongoing projects, ensuring I always have enough space for my creative work. My Mac has been running smoothly ever since, and Ive learned my lesson about the importance of managing disk space effectively.
Conclusion
Cleaning up your macOS disk space is vital for keeping your system running smoothly. By implementing the strategies discussed in this article, you can efficiently manage your storage, boost performance, and eliminate the hassles of a cluttered system.
We encourage you to incorporate regular maintenance habits, such as routinely checking for large files, uninstalling unused applications, and utilizing cloud storage solutions. Have you found any effective tips for cleaning up disk space on your Mac? Wed love to hear your experiences and insights in the comments below!
For more helpful tips and tricks on optimizing your Mac experience, be sure to explore our other content. Your journey to a cleaner, faster Mac starts today!
Questions
Who should consider cleaning up Mac OS disk space regularly?
All Mac users should clean up disk space regularly to optimize performance.
What are effective ways to clean up Mac OS disk space?
You can uninstall unused apps, delete old files, and clear caches.
How can I check my Mac’s disk space before cleaning it up?
You can check disk space by clicking the Apple menu and selecting About This Mac.
What happens if I don’t clean up my Mac OS disk space?
Not cleaning up can lead to slow performance and storage issues over time.
How does cleaning up disk space improve my Mac’s performance?
Cleaning up disk space allows your Mac to operate more efficiently and quickly.
I’m worried about deleting important files while cleaning up.
You can back up your files using Time Machine before deleting anything.